Showing posts with label Home improvement. Show all posts

03 February, 2012

Befores and Afters

It feels like Spring. What happens when Spring arrives? That unrelenting desire arrives...you know the one. That urge to beat the dust off the furniture, open up the house, give everything a good washing, and throw away the winter clutter. The problem (if you could call it that) is that it is mid-winter, and NOT a Bleak Midwinter, at that! The grass is even turning green and lush again, and the tulip bulbs are shooting up stems. The cottonwood trees at the back of our yard are blossoming, as well. Yes, it is far too soon, and I'm guessing that they will get frozen back within the month.

And yet! While it is so lovely outside, I've done a little rearranging of a few "stations" in the house. Since I can't get into some huge project a la Pinterest just yet, this will suffice!         


Before -->


I used to use the small table to grade and do simple lesson planning while at the computer. I don't do that anymore, so it needed to go!


After -->


Printer station Before -->

Organized, but not very pretty.


and after -->


Now I failed to take photos of these two stations. They were flip-flopped and the toaster oven area was a catch-all for everything from bowls of miscellany, to bread, to napkins and pot holders. The bread and the pot holders are back in their drawers on the right, and I put all the coffee things here instead. I also dropped the side-bar down for more walking space in the cottage kitchen. Note the coffee and espresso accessories on the shelf above, from the french press, Italian espresso maker, Italian coffee cups, antique coffee mill, beans tin, and the creamer whipper. I also switched out our older water dispenser for this glass carafe that had been stored unused for over a year. I will eventually be painting that kitchen wall, if hubby doesn't knock it out completely one day, or create a real breakfast bar in that area.


This is where the coffee things used to be. It always stayed pretty neat, but I wanted a change.


I know it will get cold again. We need it to kill the bugs. But when it does, I can sit back with a good book and a mug of mocha and feel great about the decluttered spaces. Now if my guys will help keep them that way...

Are any of my readers getting spring fever and tackling projects or spring cleaning?


Javamom


23 November, 2010

Fixing up the Booksncoffeehaus Cottage

What we did on our Thanksgiving vacation week ~ (and now that we have strings of colder and windier days, we are so thankful that it is 95% complete).

It began the Wednesday before break. The trees in the yard had not even really started to change colors at this point.

Part one of fall painting project: I sanded, primed and repainted all the front porch railings. This began ten days before Thanksgiving. We already had everything we needed for this step.


Sparsebeard repainting porch soffits


and priming and painting bad spots on the gables. In this shot, you can see that we got to the sanding, priming and repainting of the green trim atop the porch. It looks so good.

Moss on The Cottage


Post sanding and priming stage


Looking better already, with both of us getting the siding primed up ~


and painted (the only color that we had to buy. We still had plenty of green and peach from several years back, the last time we painted).

Bottom piece of siding is rotten and needs replacing, so...


Nailing in new siding pieces. We ended up needing to replace the bottom two (b/c of large nail holes)


New siding pieces primed up, and then primed.


Now, back to the front porch. I needed to sand the flaking, front-porch swing. We replaced the seat a couple of years ago with mahogany slats (hand-cut by hubby), but never painted them. So, this project needed to be done for several reasons.


Back slats all nicely sanded and ready for primer


Working on the back, west-facing gable


repainting front porch soffits. By this time, almost ten days later, those trees were finally changing those gorgeous colors of Autumn.


Front porch railings all primed up, plus some lovely fall color, just for fun. It was a gorgeous, 80 degree day, that week of Thanksgiving.


North wall, door, windows completed, repainted...even the green trim below repaired gutters!


It feels great to have this done, and the house ready for winter. We even re-sealed some areas around the windows before priming/painting the trim to ensure a better finish. Next Spring/Summer: New roof!!

Now, on to Christmas projects. This time: Indoor craft projects and tasks.


Javamom


10 September, 2010

In Which She Considers a Dresser

...and repaints it! Do you ever have moments of spontaneous inspiration, then find yourself acting upon it? I do, and always have worked this way. It's not just 'the economy these days' which motivates me. Nope. It's just me. Global, concrete-random, intuitive, big-picture, relational, sensing, creative-the-way-God-made-me, Me.


Besides, those of us at the cottage have always pinched our pennies and gone on the hunt for quality thrift bargains. It's part of being good stewards of our funds, and fits our desire to reduce our consumption, reuse and recycle everything that we can, or donate it so that someone else can get good use out of what we don't need anymore.

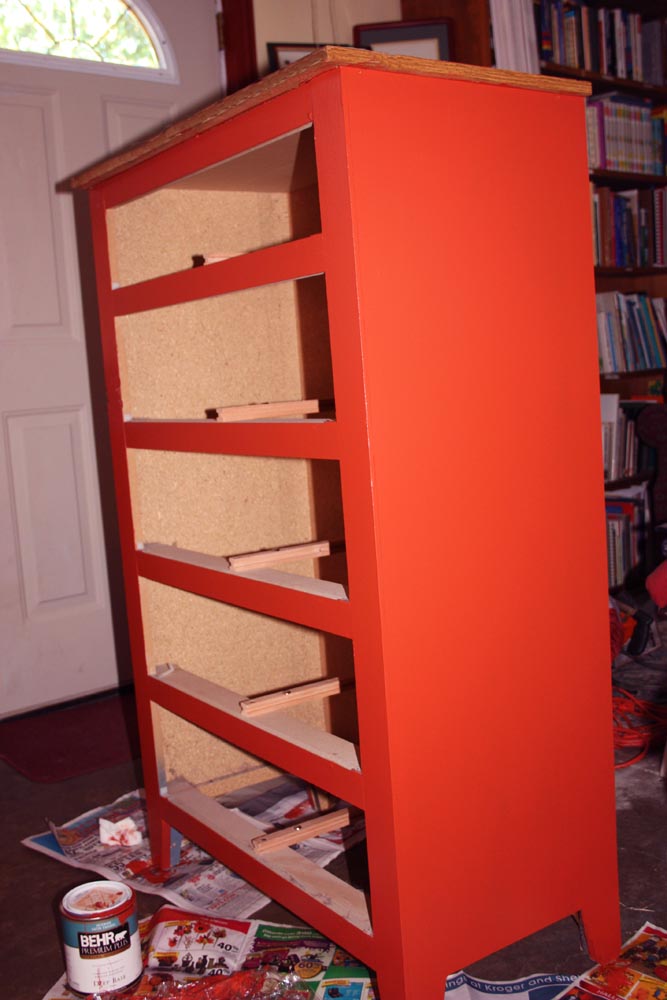
This dresser belonged to our 15-year-old, youngest son. We found it at a resale shop years ago but it had previously been an unused furniture store floor model. This is pretty common in our area, and it was a big bargain in brand new condition when we first bought it. As you can see in this photo, it now has the years of scratches and general wear and tear that a pre-teen-to-teenage boy might generally dish out over years of usage and room rearranging. I loved this color, but no room in the house carries this color scheme anymore. I considered just touching it up with a slate blue wash, but I don't have this shade on hand. It could have been maneuvered into our laundry room, after said touch-up. However,


I only have warm-toned leftover paints these days.


(in process)


(now the drawers)


and violá!

Good as new, and a lot like a dresser I've been eyeing in the IKEA catalogue.

I had considered selling it as it was, or sticking it in the attic for a while, but now...


I will find a place for it. Maybe in my room. Dear son said he wants it back in his room now (After begging me to get rid of it). Only problem is, he was given a neat, small, dark brown 'pleather' futon which matches his old IKEA cubbies, and has taken the place where his rejected dresser once stood.

Maybe I'll just rearrange my room for the first time in years. Other rooms have had plenty of reodering, shifting and repainting. But now I am inspired to change the master bedroom.

Because that's how I roll.


What fall projects have you begun?

Javamom

19 July, 2010

Orphaned Utensils as Decor

(photo by L. Allen)


I love old kitchen and garden tools. Especially red or green-handled tools. That appreciation for use of old things led me to this neat article in the online version of Real Simple Magazine.
This is a wonderful idea. What a neat way to use up odd-end forks and spoons left over from who-knows-what. I just may translate this idea to the front bathroom, which Hubby and I have been working on this summer. (well, it really began back in March ;-).

Here's another lovely idea that partially reminds me of some homes in Mexico ~


(photo also by L. Allen)

That washed-blue wall is amazing. Almost makes me want to switch from a warm color pallette that we have in most of the rooms in our home. It does give me ideas for the laundry room, and perhaps our back bathroom. I have glaze leftover from another project from last year. I'll keep you posted on how the ideas develop in the future!

Happy Decorating, friends!

Javamom

10 July, 2010

Summer Projects

Well, this is a peak of what our front bathroom used to look like. When this son (our youngest) was born, we had a serious leak from this bathroom and had to call the insurance company to help us replace the damages. We found these thick, blue 1 ft. sheets of 3-inch tiles for about half price, and did our own custom tub enclosure, saving a lot of money.


15 years later, a different sort of problem developed. Termites. Hubs was so frustrated, we finally shelled out the big bucks to rid the cottage of the munching critters. This was a week before our daughter's wedding. Then he went one step further and ripped out the wall, instead of waiting till after all those last minute crazy wedding details.


He likes to keep things rolling forward, no matter what. ;-) He then put up this lovely green tarp, so we could still use the front bathroom shower. We had lots of company, after all. I put all pride aside. It's really an ugly quality, anyway. We were shouldering a lot, and I'm sure very few people knew. Ah well. All's well that ends well, and our daughter is a very happy gal!


This major project had to wait till summer, since all money was tied up throughout the spring for our dd's wedding. We are committed to continuing to nix all debt and pay cash as we go, even on a teacher's salary. That's not always easy, and plenty of situations come up to test that commitment. But that's a different post for another day.


Here, you can see the replacement studs where the termites lived and munched for some time.


The red stuff is a roll-on backing that dries plastic. Weird, slimy stuff while appying to the backer boards.

First center tile!


Stair-steps of progress. We used pennies as spacers :-)


This was after our second full day of tiling. Quite a lot of progress, here.


applying the bullnose tiles, and fixing them with tape so they wouldn't slip-n-slide.


applying the tiles to the side of the seat/shampoo shelf


Hubby applying the grout one week after his knee surgery. He forgot to do just one wall at a time. It's been a long time since we've done this!

detailing the grout clean-up. This stuff dried so fast. Much faster than the sanded grout we used for this project 15 years ago.


Grouted, finished seat!


some filmy gunk still on the tiles, needing a good wipe-down.


close-up of the border and rope tiles. Hubby did a nice job on those mitered corners!


Finished tub! I found that red shower curtain for $7 back in February at Target, while shopping for our daughter's wedding. We had no idea that these would be the colors we chose for the bathroom. I just loved the color, the price, and the fact that it is "quilted." I had planned to possibly use it as a small table cover.
Now I just need to sand down some joints above and to the side of the new tiles, put a coat of primer on, then decide on a wall paint color. We'll probably used paint we already have, saving ourselves some more money.
What summer projects are my readers tackling?
Javamom
who loves dark red!